
Automatic portal creation: let clients register themselves
What is client self-registration?
Self-registration lets clients create their own portal without you having to set anything up manually. You share a link to a registration page, they fill in their details, and their portal gets created automatically based on a template you choose.
This works particularly well for regular client work where you have a standard process—like onboarding consultations, course enrollments, or recurring service packages.
The registration form only appears for visitors who aren't logged into your WordPress site. If you're testing while logged into WordPress, open an incognito/private browser window to see what clients will see.
When to use self-registration
Self-registration is handy when:
You want to send clients a link after a consultation call and have their portal ready immediately
You're onboarding several clients with the same type of project
You'd rather not manually create portals for every new inquiry
You want clients to access shared educational content or resources
You might skip this if:
You prefer to customize each portal before clients see it
Your projects are quite different from each other and need individual setup
Before you start: Create a default template
Registration pages need a template to work from, so you'll need to create one first.
If you don't already have any portal templates:
Go to Client Portal > Templates and click Add New Template
Give it a name (you can change it later)
Click Publish (you can add the actual content later)
You can see a full tutorial on creating and working with templates here.
Now set it as your default:
Go to Client Portal > Settings
Under "Default Portal Template," select the template you just created
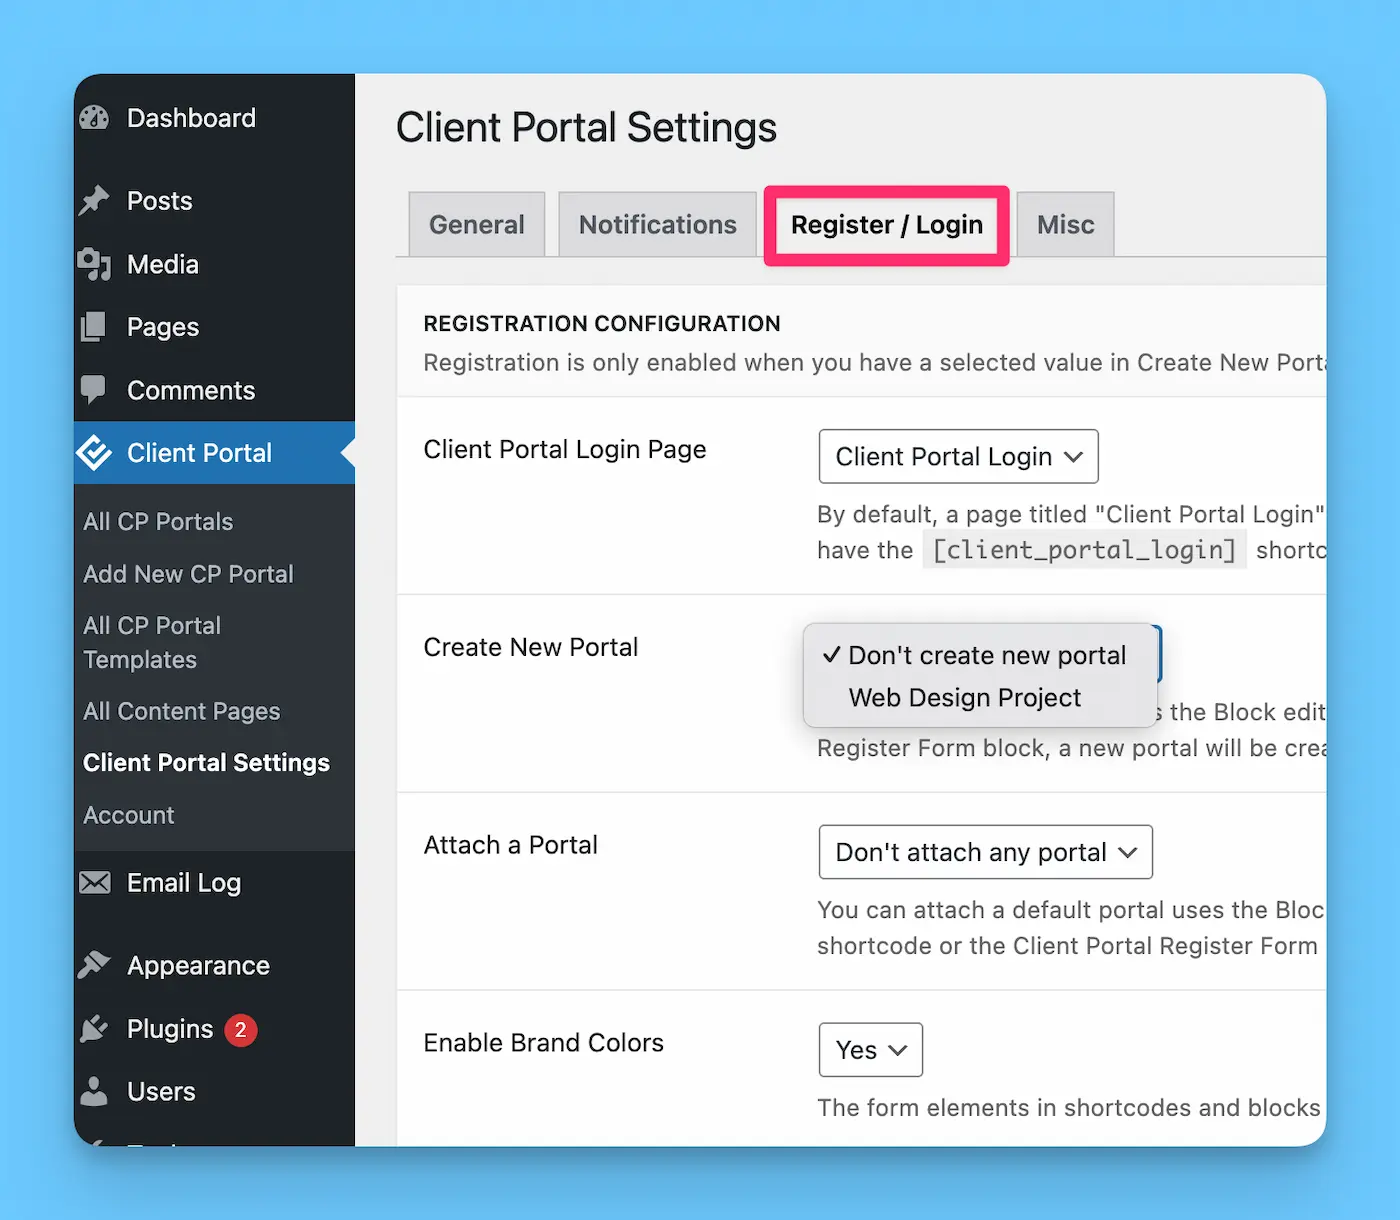
You can override the default template on individual registration pages, so you can have multiple registration pages using different templates.
Setting up your registration page
Step 1: Create the page
In WordPress, go to Pages > Add New
Give it a title like "Portal Registration" or "Client Signup" (clients will see this in the URL)
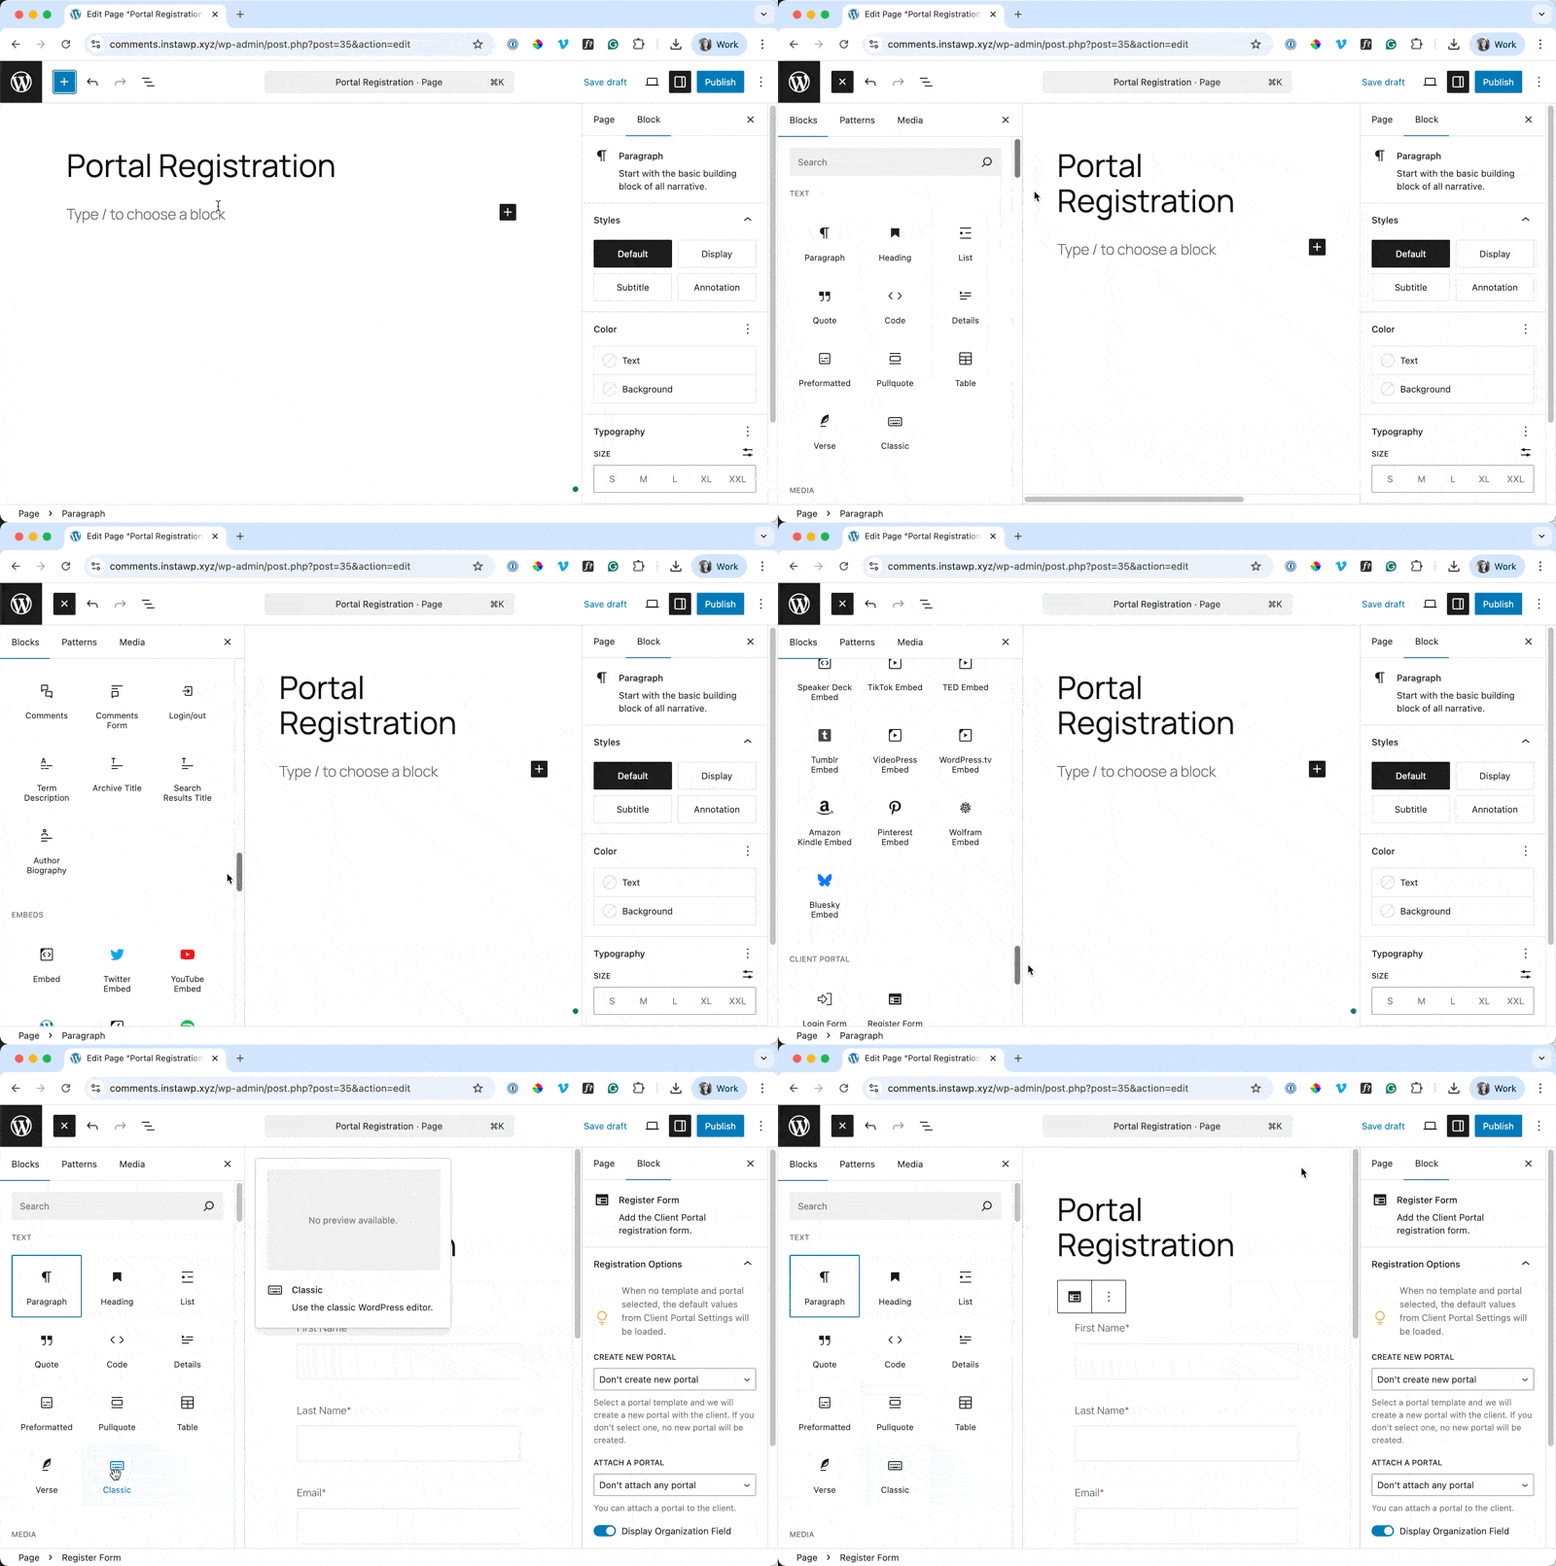
In the block editor, click the + button to add a new block
Search for "registration" or look under the Client Portal section
Add the Register Form block
Step 2: Configure the block settings
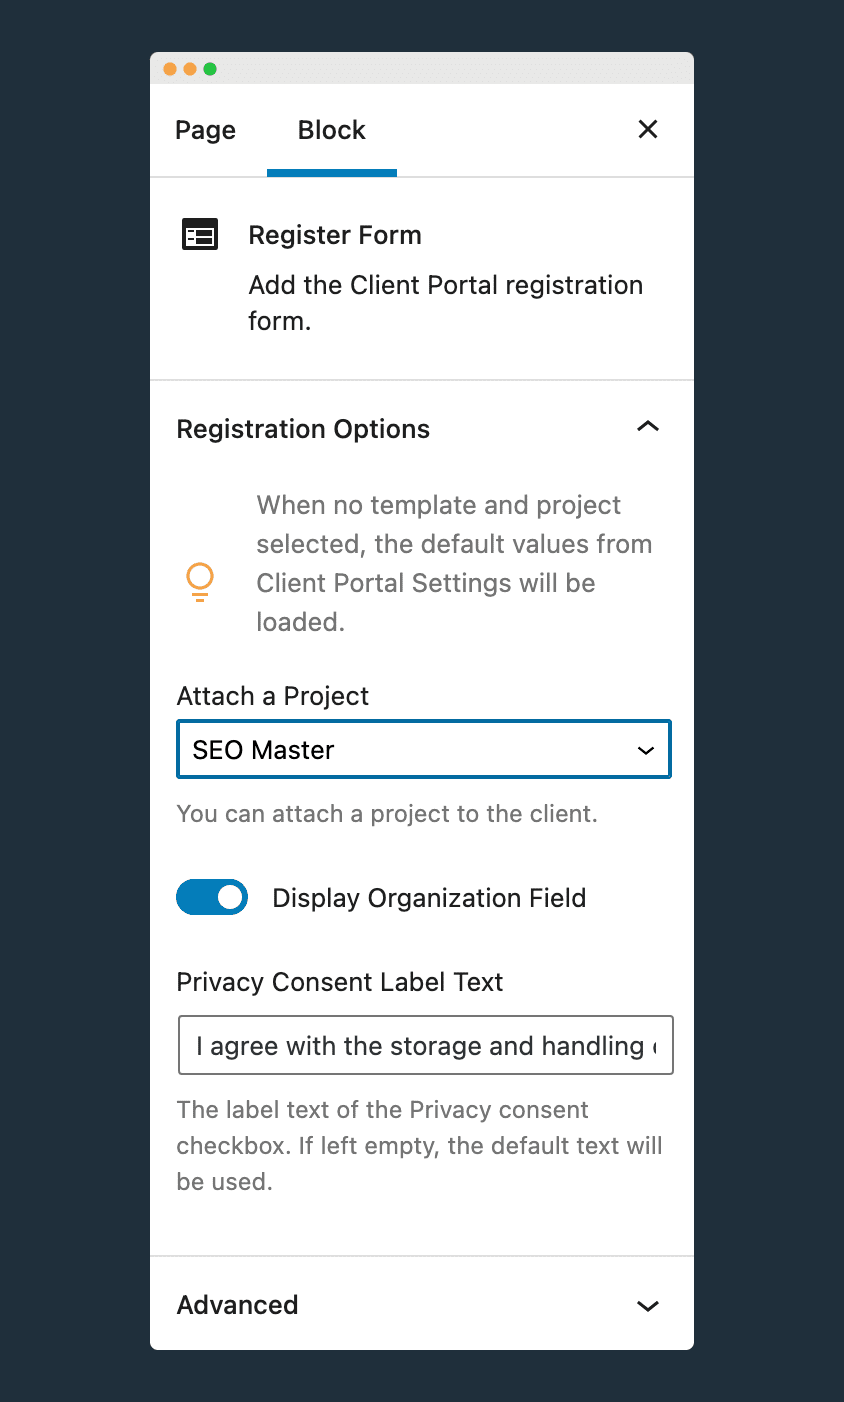
In the right-hand sidebar, you'll see settings for your registration block:
Choose what happens when someone registers:
Create new portal (most common) — Each client gets their own private portal based on a template you choose. Ideal for regular client work where each client has their own dedicated space.
Attach to existing portal — Adds the new client to a portal that's already set up, so multiple people can see the same content. Useful if you're sharing educational resources or group programs.
Optional settings:
Show Organization field — Toggle this on if you want clients to enter their company name
Privacy consent text — Customize the checkbox label and link to your privacy policy
Custom portal title — Override the default "New Project" title for created portals. To name portals automatically using the client's own details, you can use the following tags:
{first_name}— the client's first name{last_name}— the client's last name{organization}— the client's company (only if you've turned on the Organization field and they fill it in)
Step 3: Publish and share
Click Publish and copy the page URL. This is the link you'll share with clients.
Make sure WordPress user registration is enabled. Go to Settings > General and check that "Anyone can register" is turned on. Without this, the registration form won't work.
What clients will experience
For new clients (first-time registration)
Here's what happens when a new client registers:
They visit your registration page and fill in their first name, last name, email, and optionally their organization
They check the privacy consent box and click Complete Registration
They see a success message: "You have been successfully registered. Check your email for further details."
They receive an email with a link to set their password
Once they click the link and set their password, their portal is created automatically
They can then log in and access their portal
The portal is NOT created until the client sets their password. If a client says "Where's my portal?", ask them to check their email (including spam folder) for the password setup link. Once they set their password, the portal will be created immediately.
Creating multiple registration pages
You can create as many registration pages as you want, each with different settings. Just repeat the steps above and choose different templates or existing portals in the block settings.
For example, you might have:
One registration page for web design clients (creates a new portal from your "Web Design" template)
Another for consultation calls (creates a new portal from your "Consultation Follow-up" template)
A third for a group program (attaches clients to an existing "Course Materials" portal)
Common questions and troubleshooting
Can I customize what fields people fill in?
Right now, you can only toggle the Organization field on or off and customize the privacy consent text. The First Name, Last Name, and Email fields are required and can't be removed.
We're planning to add more customization options in the future.
How do I preview my registration form?
Since you're logged into your WordPress site, the registration form won't display when you view the page normally (WordPress assumes you're already registered).
To see what clients will see, either:
Open an incognito/private browser window and visit the page
Log out of WordPress and view the page
Ask a colleague to check it from their computer
The incognito window is usually the quickest option.
Can I include the client's name in the generated portal title?
Yes (in Client Portal 5.8.1 and later). By default every auto-created portal gets the same name, but you can have each one named automatically using the registering client's details.
Go to Client Portal → Settings → Register / Login and find the New Portal Title field. Add any of these where you'd like the client's details to appear:
{first_name}— the client's first name{last_name}— the client's last name{organization}— the client's company (only if you've turned on the Organization field and they fill it in)
For example, setting the title to {first_name}'s Portal means a client registering as John Smith gets a portal named "John's Portal." You can mix tokens with your own text however you like — {first_name} {last_name} – {organization} would produce "John Smith – Acme Co."
Plain text with no tokens behaves exactly as before, so your existing title is unaffected until you add a token. If a client hasn't filled in a particular detail, that part is simply left out.
The registration page styling looks weird on my website
The registration form uses your WordPress theme's styling, which sometimes doesn't play nicely with forms. This is especially common with themes like Avada or Kadence that have strong default styles.
Common issues include:
Misaligned form fields
Odd padding or spacing on mobile devices
Colors that clash with your theme
Sidebar or content layout problems
We're working on a Client Portal-styled registration page that will match your portal's appearance. For now, custom CSS can fix most styling issues.
Need help with CSS fixes? If you'd like us to help you fix the registration page styling, get in touch with:
A link to your registration page
The name of your WordPress theme
Screenshots or a list showing what looks wrong
We'll help you write custom CSS to make it look professional.
Clients can't find the registration link
The registration page is separate from the login page. If you want clients to be able to register from the login page, you have two options:
Add a text link on your login page that points to your registration page
Add both the Login Form block and Register Form block to the same page
I'm getting an error: "Set default project template"
This means you haven't set a default template yet. Go to Client Portal > Settings and select a default template under "Default Portal Template." Alternatively, choose a specific template in the registration block settings.
What happens if someone tries to register with an email that already exists?
If a client tries to register with an email address that's already in the system, they'll see an error message and won't be able to complete the registration.
This happens because each WordPress user account needs a unique email address. If your client already has an account (perhaps from registering for a previous portal), they can simply log in with their existing credentials - they don't need to register again.
To give an existing client access to additional portals:
Edit the new portal in your WordPress admin
In the portal settings, assign it to their existing user account
They'll see the new portal when they log in
If you need a client to have access to multiple portals, it's usually easier to create their account yourself via the backend rather than relying on self-registration for each one.
I'm still using an older version of Client Portal
If you don't see the Register Form block, you might be using an older version that requires shortcodes instead. Check our Legacy Documentation for the shortcode approach, or consider updating to the latest version for the block-based experience.